Key Takeaways
- Lyft driver app provides navigation, scheduling, and earning tracking for drivers.
- Drivers can go online to receive ride requests, using location filters for efficient pickups.
- Bonuses like Ride Streaks, Ride Challenges, and Lyft Bonus Zones offer extra earnings.
- The app’s intuitive design and control features help drivers optimize their work hours.
How Does the Lyft Driver App Work?
The Lyft driver app has everything you need to be successful as a driver, from navigation to cashing out.
Getting Started on the Lyft Driver App
After launching the app, you’ll see the home screen. This is the default screen – one you should get very comfortable using.
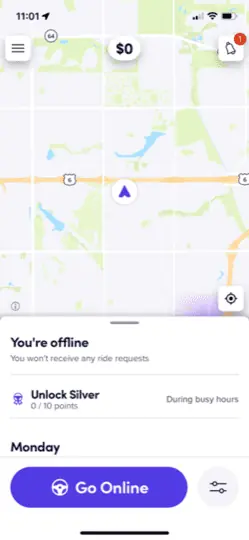
You can access driver settings from the top left corner. There, you first must add a suitable profile picture before you can start taking requests.
As a note, you can return to the home screen anytime by tapping the “X” at the top left of the page when navigating the app’s submenu. This will close the screen you’re currently viewing and take you back to the homescreen.
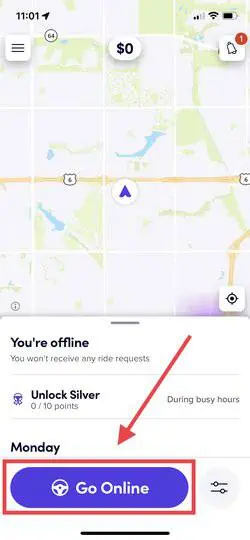
To start receiving ride requests, tap the steering wheel icon at the top of the page to go online. This indicates to potential riders around you that you’re active and ready to receive ride requests.
You can accept or decline them by tapping on the screen. You can also see the estimated time, distance, and direction of the ride before you accept them to cherry-pick the best ones.
One underrated feature within the Lyft driver app is the personalized suggestions, crafted using data from a driver’s specific geographical region. Essentially, the app tells you where and when is the best time to drive.
To get there, simply open the app and navigate to the bottom of the screen. Then, slide up in the small tab that appears:
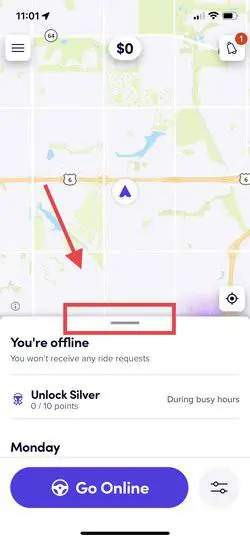
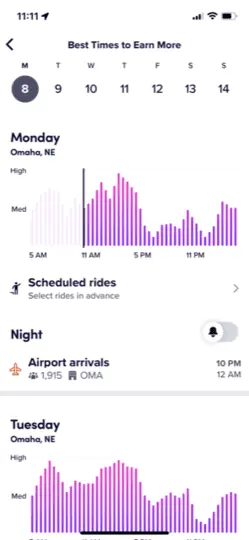
From there, you’ll see your driver status, account level, a graph showing the best times to drive throughout the day, as well as some data regarding airport pickups and timing.
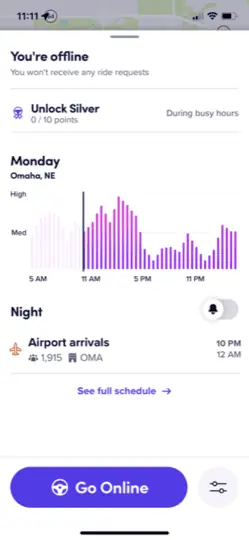
If you tap “See full schedule”, you can see additional data for an entire week. This is an incredibly helpful feature when figuring out how to schedule your week of driving.
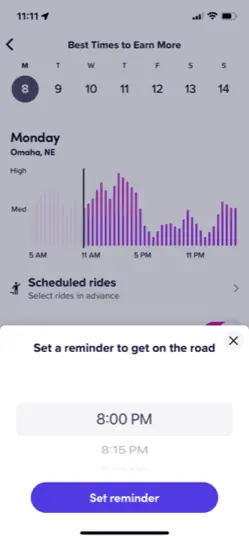
Additionally, you can also set a reminder to get on the road. The Lyft app will create a reminder for the best times to drive, which you manually select based on the data displayed in this dashboard.
Suggested: The best times to drive with Lyft
The best part is that you don’t even need to be online to see ride requests. Simply open the app and you’ll see what type of demand there currently is on the app:
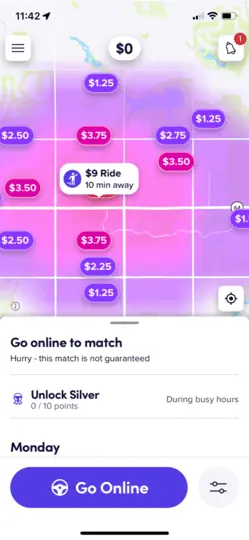
As you can see, the app displays a pretty cool heatmap showing the best spots to pick up and what they’re paying.
It also shows where a rider is requesting a ride from and how far away it is.
Navigating the Lyft Driver App’s Side Menu
The side menu is accessible when you click on your profile picture at the bottom left-hand corner of the home page. There, you can find:
- Driver Dashboard
- Scheduled pickups
- Vehicle option
- Documents
- Navigation options
- Lyft Amp
- Payment information
- Settings
If for some reason you’re not able to go online, the “Vehicle options” and “Documents” section is where you will want to first check. You’re likely being restricted due to common issues like expired registration or a vehicle in need of an inspection.
Navigation on the Lyft Driver App
To access the Lyft driver app settings page,
- Click on your profile image on the home screen
- Tap on “Account”
- Select “Settings”
The first thing to set up is your navigation settings. Most Lyft drivers stick to the default map rather than switch to Google, Apple, or Waze.
Note that Google and Waze maps may not be available in all regions. Also, if you choose Waze, you’ll have to switch between apps while navigating.
Brett’s Take: Thoughts From an Expert
The recent changes to Lyft’s GPS system have brought about some interesting issues. It’s a constant battle to balance the app’s guidance with my own knowledge of the city’s streets.
For example, the new navigation tool can sometimes suggest impractical routes, including illegal turns or paths leading straight into heavy traffic.
If I were to follow these routes exactly, I would be less efficient and far more stressed while navigating through busy city traffic.
My suggestion is to take the routes as recommendations, but using a navigation app like Google Maps or Waze instead.
Earnings and Payments
To view your earnings, click on the dollar sign at the top center of the home screen. There, you can see a weekly summary of your ride earnings, including tips and bonuses. You can cash out on your earnings from the same screen.
Lyft pays its drivers weekly via direct deposit, but if you want to get your money quicker, you can do so via Express Pay by paying a $0.85 transaction fee.
Express pay transfers typically arrive to your account within a few hours and you can cash out your earnings up to five times per day.
To set up Express Pay,
- Click on your profile picture.
- Select “Settings”
- Click on “Pay and Tax Info.”
- Select “Set up Express Pay.”
- Enter your debit card number
- Wait for the verification SMS
- Follow the text’s instructions to confirm your changes
You may have to wait up to 3 business days for your bank details to be verified before using Express Pay.
Brett’s Take: Thoughts From an Expert
I love the express pay feature because it allows access to your earnings as soon as 1-2 minutes after you give a ride.
However, I also have my Lyft account linked to a virtual Lyft credit card, which also allows me access to my earnings fairly instantly. This is great when paying for car expenses while driving – without having to dip into my personal credit card.
Location Filters
You’ll also notice something within the Lyft driver app called “Location Filters”. These are another underrated feature that every driver should know about.
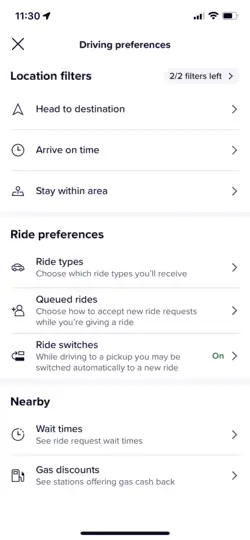
These give you greater control over the ride requests you receive by filtering them in any of three ways:
- Arrive on Time: This lets you set a preferred arrival time. It’s ideal for scheduling rides around appointments or other commitments.
- Head to Destination: This specifies one destination, so you’ll only receive ride requests along that route.
- Stay within Area: This filters your rides to within a 5-10 radius around a pinned location on the map.
To enter a location filter:
- Click on “Go Online.”
- Select the filter icon at the bottom right corner of the home screen.
- Select “Driving Preference.”
- Choose your preferred filter under “Location filters.”
Note that you can only use the location filters twice daily. Going offline while using a filter counts towards your usage limit.
Within the same screen, you are also able to change ride preferences and customize the app to better work for you. I suggest playing around with these features because some of them are actually pretty powerful and helpful.
Priority Mode
This feature lets you get more rides so you can stay busy during slow periods. This way, you’ll spend less time waiting for requests between rides and potentially earn more.
You get a fixed amount of Priority Mode hours weekly, the details of which are visible on the Priority Mode details page.
The number of available hours can be replenished or adjusted dynamically depending on how busy the area is and your performance. You’ll be unable to access Priority Mode if you have a location filter set.
Priority Mode is only available for Platinum drivers in these locations. To activate Priority Mode in the Lyft driver app, you have to:
- Launch the home screen.
- Tap the “Priority Mode” button at the bottom of the screen
- Toggle the icon to switch on Priority Mode
Lyft Driver App Bonuses
There are various features on the Lyft driver app that lets gig workers earn more from driving in busy areas. These offers may be provided in real-time or scheduled.
Here are a few examples:
1. Ride Streaks
Ride Streaks are multiple-ride bonuses you can qualify for when you accept consecutive orders during busy hours such as weekday commutes and events like New Year’s Eve and Thanksgiving.
You earn a bonus each time you complete the required number of trips for your Streak offering. As long as your first ride is within the offer period, the bonus will apply to subsequent rides.
You’ll always get a notification when Ride Streaks are available, and you can see your earnings upfront.
2. Ride Challenges
Ride Challenges lets drivers earn bonuses when they complete many trips within a specific time frame.
For instance, if you complete 20 rides between 5 a.m. Monday and 5 a.m. Friday, you’ll be rewarded with $100.
These offers vary weekly and have up to three tiers that offer different values.
You’ll get a push notification when they’re available and have 48 hours to opt in. You can cash your earnings via Express Pay or include them in your weekly deposit.
3. Lyft Bonus Zones
Lyft Bonus Zones let you earn extra money as a driver. You can enter these special areas on your map and get bonuses for each ride you complete there on the condition that you don’t cancel, go offline, or miss the subsequent ride request.
You’ll know when it’s time to be on the road and see your exact bonus amount upfront. The zones may change occasionally, depending on real-time commute conditions.
There are two types of zones: pink and purple. Pink zones offer higher bonuses than purple zones, and both are shown on your Lyft driver app’s map, whether you’re online or offline.
Note that there’s a minimum bonus of $5 if the rider cancels, regardless of your pickup or drop-off location.
Brett’s Take: Thoughts From an Expert
I am very cautious of bonus zones and rarely center my driving strategy around them. My experience with them hasn’t been all that great.
For whatever reason, the bonus zones are fairly elusive. They seem just a minute or two away, yet seem to vanish once I arrive.
I really wish that Lyft would update the app to allow drivers to “lock in” a bonus from a distance – before navigating to them – in order to guarantee that they’ll still be there when a driver arrives.
To me, it feels like the bonus system is somewhat gamified. This system is great when it works, but when they suddenly vanish, it almost appears like Lyft is dangling a carrot in front of the noses of drivers and then taking it away.
I am not alone in this. The driver forums on Facebook, Reddit, and Gigworker.com are PACKED with drivers complaining about the same issue.
My Suggestion: Try the bonus zones out, they might work for you. But if you find yourself in the same position as me, opt for a strategy that centers on consistent rides.
Wrapping Up
Signing up as a Lyft driver is easy, and the app is set up to help you start earning quickly.
Compared to the Uber app, the Lyft driver app is more intuitive and gives you more control over your rides.
To become a successful Lyft driver, you should know when people are looking for rides in your city (peak hours). Weekday commutes (9 a.m. and 5 p.m.) and weekend evenings are an excellent place to start.
Don’t forget to check the Lyft driver app for new updates from the platform.


